Ecohouse

Ecohouse
Home Sweet Home

Saturday, March 12, 2011

Nutritional Yeast

Tired of eating the same meals all the time? Looking for new ways to spice up boring dishes? If so, nutritional yeast is the answer for you! Not only does nutritional yeast add flavor to your food, it provides you with tons of essential nutrients (I know, the name gives it away).

What IS Nutritional Yeast?

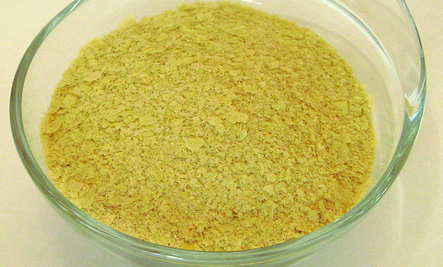
Flakes- Mmmm mmm good!
So what exactly IS nutritional yeast? Nutritional yeast, or as we lovingly like to call it "flakes," is a yeast that is produced specifically for its nutritional value and is grown by culturing yeast with a mixture of beet molasses and sugarcane. After the yeast undergoes the fermentation process, it is harvested, washed, and dried. The result is a delicious substance that slightly resembles fish food, but don't let its flaky appearance fool you. Once you add flakes to your meals, you will never turn back! Mary Leciejewski, an Environmental Studies grad student and Ecohouse friend says, "Nutritional yeast is delicious and nutritious. I use it on everything. Honestly, I don't know how I lived without it!"

Nutritional Value

In addition to being naturally low in fat and salt, nutritional yeast is an excellent source of protein, dietary fiber, amino acids, vitamins, and minerals. It is an especially good source of the B-complex vitamin, which is important in promoting healthy skin growth, increasing metabolism, immune and nervous system functions, as well as reducing the risk of pancreatic cancer. Two heaping tablespoons of flakes contains 8 grams of protein and 4 grams of fiber at just 60 calories!

What Does it Taste Like?

Nutritional yeast has a strong cheesy or nutty flavor, which makes it popular as a cheese substitute among vegans and vegetarians. It can be paired with almost any dish, including stir fry, scrambled eggs, mashed potatoes, pasta dishes, garlic bread, and so many more. My personal favorite use for flakes is as a popcorn topping. Some movie theaters offer nutritional yeast in addition to salt and butter, and once you try it you will understand why!

Fun Facts 

Nutritional yeast is referred to as "savoury yeast flakes" in Australia, while it is known as "brufax" in New Zealand. In the U.S., it is sometimes called "yeshi" which is Ethiopian and means "for a thousand." Prisoners of war have used "home-grown" yeast to prevent vitamin deficiency.

Where to Find Flakes

Nutritional yeast can be found in most natural foods stores. The Nature's Market section in Kroger also carries this tasty kitchen must-have. If shopping locally at the Athens Kroger, you can find flakes packaged in a pound container and a pint (quarter pound) container.

Try These Recipes!

Ok, so you bought some flakes but aren't sure how to incorporate them in your diet. Try one of these delicious recipes and you will be hooked!

For the best popcorn you've ever tasted:
Ingredients:
  • Organic popcorn
  • Extra virgin olive oil
  • Nutritional yeast
  • Salt, pepper, garlic powder (optional)
STEPS
  1. Cover the bottom of a medium saucepan with a layer of extra virgin olive oil
  2. Turn the heat on the stove to medium-high and add a few kernels of popcorn 
  3. Cover with lid
  4. When the kernels have popped, the pan is hot enough to add the amount of popcorn you want.
  5. Wait for popcorn to pop and remove from heat so that it doesn't burn
  6. Pour popcorn in a bowl and sprinkle with a generous amount of nutritional yeast
  7. Add salt, pepper, and garlic powder if desired and enjoy!

Delicious Pasta and Greens

Ingredients:
  • Pasta of your choice (We recommend vegan pasta from Crumbs Bakery in Athens)
  • Greens of your choice-broccoli, collards, kale, etc.
  • Nutritional yeast
  • Butter (to help yeast stick to pasta)
 STEPS
  1. Boil water and cook desired amount of pasta in a pot on the stove
  2. In a separate pan, melt two tablespoons of butter (or more depending on how much you are making) and add greens to cook on a medium heat
  3. Once the pasta and greens are cooked, combine them in one pan
  4. While it is warm, add a generous amount of nutritional yeast to the dish 
  5. Enjoy!
*Remember, you can never have too much nutritional yeast, so don't be afraid to use a lot. Well, at least that's our philosophy at the Ecohouse!

Sunday, February 13, 2011

DIY: Sprouts

Interested in saving money on your grocery bill while still eating healthy? Growing sprouts at home is the perfect solution!

Sprouting is a great way to garden in the winter, and it is perfect for people who have a small living space because sprouts can be grown in a glass jar without taking up any room. Sprouts are nutritious and tasty, and compliment just about everything from sandwiches and salads to stir-fry and casseroles. Once you start sprouting, you will be hooked! Thanks to Jim, we have a constant supply of sprouts at the ecohouse in a variety of different types including red clover, alfalfa, and lentils.

To start your very own sprout collection, follow the easy step-by-step instructions below. You'll be a sprouting pro in no time!

Getting Started: What You Will Need
1) Seeds of your choice (recommendations listed below)
2) Jar (any type will do but we use glass mason jars)
3) Cheesecloth
4) Rubber Band

** If you live in Athens, my suggestion for buying seeds locally would be The Farmacy. You can buy seeds there for sprouting in addition to sprouting mixes that include a blend of seeds. Also, if you're looking for cheesecloth in Athens, you can find it at Kroger in the kitchen section.

Choose Seeds and Measure
Here are the best choices of each type of sprout source.
(Recommendations from www.thefarm.org) 
  • Best seeds: alfalfa, clover. 
  • Best beans: mung, lentil, garbanzo. 
  • Best nuts: almonds, filberts (hazelnuts). 
  • Best grains: wheat berries, rye. 
The next list indicates what amount of sprout source is appropriate. 
  • small seeds: 2-3 tablespoons (30-45 ml). 
  • medium seeds: 1/4-1/2 cup (65-125 grams). 
  • large beans and grains: 1 cup (250 g). 
  • sunflower seeds: 2 cups (500 g). 
The Process
  1. Before you go to bed, measure out the correct amount of seeds. In the case of alfalfa, 2-3 tablespoons.
  2. Next, pour the seeds onto a plate and inspect them for broken or withered pieces, small stones, and lumps of dirt (pictures below).
  3. After they're sorted, pour the seeds into a strainer and rinse under water. Make sure your strainer has very fine netting so that your seeds don't get washed down the drain!
  4. Pour your rinsed seeds into a jar.
  5. Cover the seeds with water. The water level should be a few inches (6-8cm) above the seeds. Let them soak overnight. If your seeds are medium sized, soak them for 8-12 hours. Large seeds should soak 12-24 hours.  
  6. Cover the mouth of the jar with cheesecloth the next morning and secure with a rubber band. 
  7. Turn over the jar in the sink and strain out the water. *Note- Some people save this water because it is full of nutrients. You can use it as an ingredient in a health shake or feed it to your houseplants! 
  8. Shake the jar to remove excess water. 
  9. Rinse the seeds again and shake the jar to remove extra water. Hold the jar up to the light to ensure the seeds are mostly dry. If they're too wet, the seeds may rot during sprouting.
  10. Drain the seeds all day by tipping the jar on its side upside down in a bowl or dish. 
  11. Repeat the rinsing process on the evening of the same day. For 4-5 days you will continue this process of morning and evening rinsing and draining. 
  12. Watch for growth. After a few days you will begin to see green leaves sprouting on the seeds, and white shoots will appear on beans, nuts, and grains. 
  13. Harvest! The sprouts will reach their best flavor and nutritional value after 4 or 5 days. Give them one last rinse and shake. They're ready to eat! 

**For more detailed instructions and ideas for using your sprouts once they are completed, click here.

Tips
  • For best results choose organic seeds. They are less likely to be treated with pesticides. You can buy seeds online, or visit your local health food store to buy organic dried beans and seeds to start sprouting on your own.
  • Only grow as many sprouts as you can eat in a week. Sprouts become soggy very quickly. While sprouts usually mature in 3-5 days, the sprouting time depends on the temperature of the growing environment.
  • According to Becca (a fellow environmental blogger in Athens), sprouting kits are on the top ten list of sustainable must-have items for 2011. Visit her blog for additional information about sprouting and see the other nine must-haves for this year!!

Step 2- Jim inspecting seeds


Step 6- Cover the jar with cheesecloth

Step 6- Secure cheesecloth with rubber band
Step 10- Drain the seeds

Our collection of sprouts!

Sunday, January 30, 2011

We're Back!

Winter Break

After a long and relaxing holiday break, Winter quarter is back in full swing...and so is life at the ecohouse! In my last post, I mentioned that it was my goal over break to share what I have learned about eco-friendly living with my family and friends. My family was really excited about the new information, and were on board with trying to recycle more. They are now recycling aluminum, plastic, and cardboard!

Now that they are recycling more, my next goal is to have them start their own composting bin. While living at the ecohouse, I have found composting to be my favorite lifestyle change. It is very simple to do, and there are many benefits. Not only does composting divert trash from the landfill, it also creates nutrient-rich soil that can be used in the place of chemical fertilizers. While my mom finds composting to be interesting, I am still trying to convince her that it is easy and mess-free (for more information about how to start your own compost bin, refer to my previous post). For now, increasing their amount of recycling is a step in the right direction, and I am happy that they were so receptive to the idea.

Winter Quarter Projects

Every quarter the ecohouse residents devote 14 hours of work to projects that pertain to sustainability and eco-friendly living. This quarter, the three of us have all chosen a common theme: DIY. There is a large amount of information available related to do-it-yourself projects, so we decided that narrowing down some of the best methods for sustainable DIY projects would be worthwhile. We will be updating the blog throughout the quarter with what we have found so that you can try sustainable DIY too!

Since much of our time during Spring quarter will be devoted to making our own food by gardening outdoors, we decided that we wanted to learn about other sustainable options that can be made year-round. Jim's main focus this quarter will be on making food. He has already successfully made sprouts and homemade yogurt (posts will be coming soon on how to make these yourself). More projects are in the works to make Kombucha tea among other things...stay tuned for more!

Kate is more interested this quarter in DIY body care. She is in the process of making face/body scrubs that can be made out of simple ingredients that are all-natural and nourishing to your skin. Most body products out on the market actually contain petroleum and toxins, and that is not good for our bodies! She will be making guest posts to talk about what products she has found to be the easiest to make and the most sustainable.

As for me, I am going to be looking into green cleaning products in addition to sustainable food ideas. Growing up, my mom was always very meticulous about cleaning our house, and this is a habit that I have carried with me into my adult life. As strange as it may seem, I actually enjoy cleaning. It always feels great to have a clean house. Cleanliness is especially important living at the ecohouse, where people are constantly taking tours or visiting. At this point, all of the cleaners I use are considered "green," as most of them have ingredients derived from coconuts. However, many of the eco-friendly cleaning products on the market are expensive and come in packaging that isn't recyclable. It is my goal to make my own cleaning products this quarter that are inexpensive and sustainable while still being effective.

So that's the breakdown of this quarter's projects. Look for my next post coming soon on how to make sprouts! 

Friday, November 19, 2010

Fall Quarter Comes to an End

It feels like just last week that my roommates and I moved into the ecohouse, and now the quarter is already coming to a close! I have learned a great deal over the past few months living at the ecohouse, and I look forward to returning in January to continue soaking up new information about eco-friendly living. Here is a list of the highlights from Fall quarter:
  • Creating a two week No Impact Challenge based on Colin Beavan's year long pursuit to live without a negative environmental impact in New York. From this challenge, we were able to get a better sense of areas where we could reduce our carbon footprint and what would be manageable to live without in our everyday lives. This event challenged us to not buy anything new, go without producing trash, use only sustainable transportation, buy local foods, reduce our energy use, etc. What we found is that we were already doing most of these things by biking everywhere in Athens, shopping at the farmer's market, and not buying new items other than food. From the two week challenge, we collectively produced only half of a bag of trash waste. We found that most of the trash in that bag came from food packaging. After the challenge, I realized that purchasing food with minimal packaging is the area that I can improve upon the most. I have been more conscious of this when shopping for groceries. Overall, the challenge was a success because we were able to identify personal areas of weakness while sharing our journey with others through social networking.
  • We held a zero waste bonfire event in October. To welcome our friends to the ecohouse and introduce them to our environmentally conscious lifestyle, we decided to host an international potluck/bonfire. As many of our guests were going to be international students, we asked everyone to bring a food dish from the country they are from. Guests were asked to only bring dishes in reusable containers without plastic wrap or other materials that cannot be recycled. We set up our recycling bins in a visible location with signs explaining what each container was for. Over 40 people attended this event, and we were impressed to find that less than one small trash can of waste was generated from the night. This showed us that it is easily possible to dramatically reduce the amount of waste produced when entertaining, and that there is no hassle involved with making changes such as this. Not only was the event a wonderful evening filled with friends and fun, it was an opportunity to share the ecohouse culture of sustainability with a large number or people. Everyone was very receptive to the idea of recycling and bringing reusable containers, and many said they couldn't wait for another bonfire!
  • Over the course of the quarter, we have become more familiar with the technology powering the ecohouse and have had the opportunity to share the history of the house with others through group tours, open houses, and many personal interviews with journalism students, newspapers, and other media outlets. The primary purpose of the ecohouse is to serve as an educational tool that will generate critical thought and discussion amongst visitors about sustainability and environmental issues. This quarter has been a learning experience for myself about public communication and learning effective ways to share a positive message about the benefits of living green. Next quarter, I hope to continue developing my skills as a public speaker and environmental advocate.
 Overall, this quarter has been a wonderful experience for me personally. Over winter break I am challenging myself to take what I have learned about recycling, composting, and energy conservation to my hometown to share with family and friends. My family already recycles plastic at home, but my goal is to set up bins for other types of recyclable materials, as well as start a composting system. It is my hope that this experiment over winter break will demonstrate to my family how simple it is to reduce your waste through small changes. If you are a student going home for break, I challenge you to do the same thing with your family and share your experiences with us. In the meantime, Jim, Kate, and I look forward to hearing from you in January and wish everyone a safe and happy holiday season!

Tuesday, November 16, 2010

Vermicompost

This is our vermicompost bin at the ecohouse. Vermiculture is a type of composting that uses worms. It is beneficial because it allows food waste to compost rapidly in a self-contained system.  The biggest concern I hear from people about creating a vermicompost system is the smell. However, if you properly maintain your bin, it should not smell!! 

How to create your own vermicompost system:
  • Obtain a bin. As you can see, ours is just a plain rubber bin that is double layered. The double layering is necessary because the inside bin needs to have holes drilled in it for ventilation. 
  • Drill 1/8 inch holes approximately four inches from the bottom of the bin. Otherwise, the worms will stay at the bottom of the bin and possibly drown.
  • Prepare the box for worms. Fill your bin with fibrous material such as thin strips of newspaper, cardboard, grass, straw, etc. Sprinkle dirt on top of the fiber material and moisten with water. Allow the water to soak for at least a day before adding worms. 
  • Add worms! Eisenia foetida (Red Wigglers) are the most common species used for vermicomposting. These are special tropical worms that cannot withstand cold temperatures, so make sure to keep your bin in a warm area. It is not recommended to dig worms out of your back yard for composting. If you live in Athens, you can purchase Red Wigglers at the local farmers market located by the State Street mall on Wednesdays and Saturdays.
  • Maintain bin. You will speed up the composting process by keeping your bin elevated. Also, your worms will not attempt to escape if you add food waste and moisture regularly. Feed your worms food scraps weekly and add fibrous material when needed (usually once a month). 
  • Harvest your compost. Remove a large amount of compost and place on a piece of newspaper or plastic. Allow time for the worms to bury into the center of the compost heap, and eventually you will have two separate piles, one for the worms and one for compost. Return the worms to the compost bin and use the remaining compost for whatever you like!
There are many online sources available that explain vermicomposting techniques. However, I found the website mentioned below to be particularly helpful in giving easy, detailed instructions on how to create your own system:


http://www.wikihow.com/Make-Your-Own-Worm-Compost-System

Worm Factory


This is a photo of our worm factory located in the ecohouse basement. We just cleaned it out and filled it with new redworms! 

How it works: 
  • There are several different removable bins with holes in the bottom of each, and these bins fit together to form the worm factory and allow the compost from worm waste to be sifted to the bottom
  • To start your own worm factory, place moist newspapers in the top feeding tray and place food scraps under the moist sections
  • The balance of food and fiber should be 50/50.
  • Once you have added the proper ratio of food and fiber, you can add worms to the top tray
  • For feeding the worms, you should follow the guidelines of 1 pound of worms to 1/2 pound of food per day 
Our worm factory currently has less than 1/2 pound of worms because winter break is approaching, and we want to make sure the worms will have sufficient nutrients to get them through the months that we will be gone.

Possible fiber sources that can be used for the factory:
  • Shredded paper
  • Magazines
  • Cardboard
  • Kleenex, napkins, junk mail
  • Even dryer lint and vacuum dust!


Saturday, October 23, 2010

No Impact Challenge!

Every Sunday evening, the ecohouse residents have a house meeting to discuss projects we are working on for the quarter and possible ways to engage the community in the activities we are doing. Jim had watched a documentary called No Impact Man recently about Colin Beavon, a New York journalist that ventured on a year long experiment to see how much he could reduce his ecological footprint. Jim proposed that we try to replicate Beavon's No Impact Challenge at the Ecohouse to experience what it takes to reverse our carbon footprint. After several discussions, the three of us decided that it would be an even greater learning experience if we engaged the Ohio University community in this challenge, so we advertised through social networking tools, and now the challenge is underway!

Find out more information about how to join us in the No Impact Challenge by following this link: http://big.assets.huffingtonpost.com/noimpactweek.pdf

The above link describes a one week challenge, but we decided that two weeks would be a better time frame to fully experience the proposed lifestyle changes. On the first day, the guidelines direct you to not buy anything new. So, instead of just following that rule for one day, it is extended to two days for our challenge. From that, you build upon what you were doing the previous day to reduce your impact. Our challenge began on October 17, so we have a little over a week to go!

Here are the guidelines we have been following for the challenge so far:
Sunday and Monday- Don't buy anything new
Tuesday and Wednesday- Don't produce any trash, and if you have to, keep it in a bag to see how much you consumed at the end of the challenge
Thursday and Friday- Only use sustainable transportation (walking, biking, etc.)

Being Saturday, we are now considering our food intake. The Beavon family took all processed and packaged food off of their grocery list. They ate seasonally and locally. Not only will this allow you to eat foods that are healthier, it will also reduce your carbon footprint by buying locally grown foods that do not need to be transported as far, as it will support the local economy. Shopping at a local farmer's market is the best way to get healthy food and reduce your impact.

Want to find out more about the challenge and what others are doing? Visit the No Impact Challenge facebook event for more details. Below is the description given of the challenge on facebook. Stay tuned for more updates!

Facebook
On each day of the No Impact Challenge, participants are asked to make one change in their lives so that by the end of the two-week period, participants are not only reducing their negative impact on the planet - they are actually creating positive impact. Originally, the challenge was designed to last one week, but we're extending it to two. Participate as little or as much as you would like - everything makes a difference.

At the end of the challenge, participants are asked to reflect on the changes they made - what worked, what didn't, and most importantly, what they want to keep doing. The goal is to help people find feasible ways to change their lives for the better. The best part? These changes don't just benefit the planet; they benefit you, too.