Ecohouse

Ecohouse
Home Sweet Home

Wednesday, May 23, 2012

Compost!

Last week I dedicated a good amount of time to our community garden. The garden is really starting to shape up. We added three more raised beds and did a good amount of weeding, composting, and mulching. 

Before: Bin full of weeds
Speaking of compost...one of my big garden projects for the week was weeding the new compost bin. This was quite a chore because the weeds were as tall as me! Although it took a lot of physical labor to weed the beds, I was happy to be outside in the sunshine, enjoying a beautiful day. For the past month I have been cooped up inside writing my thesis, so that didn't leave as much time as I would've liked to enjoy the outdoors. Now that my thesis is written, I was more than happy to be working outside working with my hands, making a tangible difference. It was very rewarding to see the end result of my efforts. Now the garden has a working compost for community gardeners that will be free of weeds!

Before Weeding
You would think that after dedicating the past two years to researching compost practices for my thesis that I would be sick of talking about compost, but that is not the case! I have always been interested in composting, but I have learned about so many benefits of composting that I can't help but want to share some of them with anyone willing to listen. So if you're interested in learning more about why composting is important, this blog is for you!

For starters, many people think that composting is only for people who want to use the soil for gardening. Although it makes wonderful nutrient-rich soil, composting is also important as a waste management strategy. In 2010 the EPA recorded that 33 million tons of food waste were sent to landfills. This makes food waste the biggest contributor to landfills. Waste is becoming a big issue with growing population and consumption patterns. The U.S. municipal waste stream has tripled since the 1960s. Today, 4.5 pounds of food waste is produced per person per day compared to 1.8 pounds 45 years ago. That is a HUGE increase that needs to be fixed with sustainable solutions. Composting is one solution to help with food waste because the EPA projects that 67% of American household waste can be composted. 
After: Weeding Success!

Composting is still a relatively new practice for food waste diversion in the U.S. There are some cities like San Francisco that require composting, but most cities do not have composting pickup available because it is still cheapest to send food waste to the landfill. Many European countries that are facing space constraints have adopted new waste management strategies to reduce the amount of waste going to landfills. Scotland is one of these countries. A few years ago Scotland was only recycling 4 percent of possible materials, but new targets in the Scotland’s Zero Waste Plan require Scotland to recycle 70 percent with a maximum of 5 percent to landfill by 2025. In order to achieve a zero waste Scotland in the next 10 years, the government has been progressively increasing the landfill tax each year in order to encourage more sustainable methods of waste disposal. This government-inspired shift in protocol has made composting an increasingly attractive waste disposal practice for businesses. The United States needs to create government mandates like Scotland and other European countries have done in order to make composting a viable waste management option.

There are tons of benefits to composting, and it is a great tool for climate change mitigation. The following list of benefits relates to the potential of composting as a mitigation tool for climate change. Composting results in: 

Removal of atmospheric carbon through soil carbon sequestration
Reduction of GHG emissions through reduced production of chemical fertilizers and pesticides
Landfill cover reduces GHG emissions
Reduction of GHG emissions through reduced irrigation
Reduced diesel use for soil cultivation from improved tilth and soil workability
Reduced need for biocides reduces GHG emissions from biocide production
Reduced nitrogen loss that causes N20 emissions
Reduced erosion that results in N20 emissions from loss of nutrients and organic matter
Abatement potential for manure management
 
Additional benefits of composting include:

Effective bio-filter for reducing pesticide contamination in water spills
Provides a less costly alternative to conventional methods of remediating (cleaning) contaminated soil
Helps prevent pollution
Compost has also been shown to prevent erosion and silting on embankments and prevents erosion and turf loss on roadsides, hillsides, golf courses, etc.
Realistic Energy Option using Anaerobic Digestion Plants
Restoring nutrients to the soil
When used for growing crops, compost has shown to increase soil water holding capacity, add nutrients, and stifle soil-borne diseases
Offers economic benefits
It serves as a marketable commodity and is a low-cost alternative to standard landfill cover and artificial soil amendments. Composting also extends landfill life

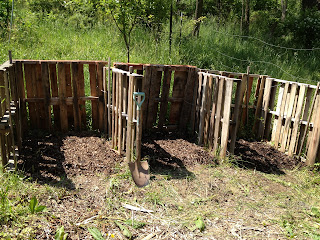
After: New 3-bin compost!
Overall, composting simultaneously reduces GHG emissions, improves sustainability, prevents soil and water contamination, conserves resources, provides renewable energy options, increases soil nutrients...and the list goes on and on! In 2005, the U.S. disposed of 25 million tons of food waste into landfills. If this food waste had been composted, the GHG emissions impact would have been equal to removing 7.8 million cars from the road! The majority of the population is not aware of all the wonderful benefits that composting has to offer because it is not yet a common practice. So share this information with the people around you, they will be surprised to find that it is easy to do. Depending on where you live, it can also save you money on trash disposal costs by cutting down the weight of your trash bins every week. I was amazed by how many garbage bags we saved at the Ecohouse by composting compared to what I was used to before having a backyard compost pile.

Winner of the International Compost Awareness Week poster contest
May 6th-12th was International Compost Awareness Week (yes, there is an entire week dedicated to composting) supported by the U.S. Composting Council. It is the largest education initiative of the composting industry every year. If you are interested in learning what communities and cities are doing with composting around the country, follow ICAW on facebook or visit their website at http://compostingcouncil.org/icaw/.


Wednesday, April 25, 2012

Earth Day!

Hello Eco-Lovers,

Did you have a good Earth Day? What did you do to celebrate? There was a lot of activity going on at the Ecohouse on Earth Day this year thanks to the workshop we hosted called "Permaculture Basics for Small Spaces." This workshop was designed to teach the principles of permaculture to help beginners start designing productive, low-maintenance and ecologically sound small spaces.

After two days of participants learning about permaculture through lectures and engaging activities on April 14th and 15th, it was time to put their knowledge to use by implementing a design in the front garden of the Ecohouse. We were thrilled to volunteer our garden space for a practice design because it was getting overgrown and unmanageable! Having the front garden modeled after a natural ecosystem is perfect for the house because it adds one more sustainable element that we can talk about and share with tour groups interested in learning about sustainable practices. Set up a tour and check it out in person!

Finished Permaculture Design


Tuesday, April 17, 2012

A New Year, New Adventures!

Hello Ecohouse Followers!

The Garden "Before" Transformation
After a hiatus from the blogging world, I am back to tell you all about what has been going on this year at the Ecohouse. I am living at the house for my second year with two new roommates, Hannah Simonetti and Torin Jacobs. We have been working hard to collaborate on new projects this year, the biggest one being to transform our garden into a community garden space to share with interested groups or individuals in Athens. We are excited about this project because it will be another way to involve, share, and grow with the local community in sustainable living for years to come.

Loved getting to know the community assistants!
Fall Quarter Community Work Day    
Torin happily participating at the Fall garden work day
We started brainstorming for the community garden project during fall quarter and have been making steady progress on the project this spring. In the fall, we had a tremendous amount of help preparing the garden for winter from the local group of community assistants. We were thankful to have such a wonderful group of enthusiastic volunteers helping us for a work day in the fall. With the help of so many volunteers, we were able to weed and apply a lasagna composting technique over the entire garden, consisting of layers of cardboard, compost, and mulch. I was amazed at how great our soil looked this spring after applying this technique. We were also able to plant garlic in the fall, which has already grown to an enormous size!


Building Raised Bed in the Spring
Side Profile of the New Garden Improvements
We were all really excited to get back in the garden and get our hands dirty after the long winter. We accomplished a lot during our first work day this spring. We put in four new raised beds for community plots, filled them with compost, and built a 3-bin compost bin. It was still a little cold and breezy during our first work day, but things warmed up for us last week as we continued with the work. The warmer weather has brought plenty of weeds with it, so we spent a few hours last week weeding, adding compost to the remaining bins, and preparing for a marigold pallet fence that we are going to build in front of the garden to help with animal control. I've never seen a pallet fence like the one we are going to build, but I am really excited because it will create a "secret garden" feel as you drive up to the space. It will not only be a great way to keep deer out of the garden, but also a way to attract visitors traveling our road.

Since I am graduating this quarter, I have mainly been stuck inside working on my thesis, so working on the community garden has been a wonderful way to relieve stress and enjoy the beautiful weather of spring. I look forward to sharing our next steps in this process with you!
Current Garden With New Raised Beds and Compost Bin!


Thursday, June 9, 2011

End of the Year is Here

Is it really the end of the 2010-11 school year? Wow, this year has flown by but not without creating many memories that will be remembered for years to come. I know I can speak for Kate, Jim, and myself when saying that we will never forget our time at the Ecohouse and all of the knowledge we have soaked up while living there this year. Luckily for me, I will be back for another exciting year in the Fall!

So you might be wondering what we have been up to at the Ecohouse this quarter, and the answer is gardening! The three of us have never grown a garden on our own, so it has been a learning experience trying to start seedlings this year and keep them alive, but we succeeded! In this post you will find lots of pictures documenting our adventure over the last ten weeks. It was amazing to me how fast the seedlings would grow in just one week. We grew cucumbers, green lettuce, peppers, tomatoes, basil, oregano, spinach, onions, carrots, broccoli….and the list goes on and on! 

Starting the seedlings


The seedlings start to come to life

After just a few days the Dragon beans are sprouting like crazy!
My favorite growing experience was starting Dragon Tongue Bean seedlings. Jim and I decided that these must be the beans from the fable “Jack and the Bean Stalk,” because they grew like magic! Once I started all of the seedlings, I covered them in plastic wrap and put them on top of our refrigerator to wait for sprouting. Only a few days after planting these “magic beans,” they were sprouting half an inch! Within a week we needed to transplant them because they were too big for their containers while the other seedlings were just starting to develop. These beans are purple with a hint of green and are of the bush bean variety. The pictures tell the story!

They're magic beans!

Kylie and Mary planting lettuce

Tilling the garden the ole' fashioned way
We ran into a few bumps along the road in our gardening journey, starting with the rain. We all know the saying “April showers bring May flowers,” but I didn’t realize that literally meant the ENTIRE month continuing into May. This was one of the rainiest Springs Southeastern Ohio has seen in a long time. While it was frustrating not being able to use the Rota-tiller on our garden due to the high volumes of rain, we persevered and managed to find a couple days where it was dry enough to get the ground ready. 

Unfortunately, those days were not ones that we had the Rota-tiller available, so we decided to garden the old-fashioned way with rakes, hoes, and shovels. One thing I quickly learned: Gardening is not for the weak minded! It takes a lot of dedication and back-breaking labor to get a garden ready, but I found the experience to be completely fulfilling and rewarding. It is a great feeling to be self-sufficient and able to create conditions for living things to come to life.  

My grandparents lived through The Depression, and they had to live off the land in order to survive. They knew how to garden, reuse, and save in every way possible to live and feed their eight kids. I’ve heard many people today say that the older generation that lived through The Depression would be the people to survive today if a major catastrophe happened.  More and more, people are relying on technology to do things for them and we are losing basic survival skills like those needed during The Depression.

Jim glistening in the sun from workin' hard
 People are in such a hurry and so “busy” today that they don’t have time to garden. Instead, we buy food transported from thousands of miles away, grown in locations we don’t know, in conditions of which we are not aware. I don’t know about you, but I want to know what is in the food that I am putting into my body. I want to know that I am not eating genetically modified vegetables covered in chemicals and pesticides, grown in synthetic petroleum-based fertilizers. 

Why don’t we care about these things anymore? Personally, I never used to care about these issues because I was not aware that they were issues in the first place. I never gave a thought to what I was eating because I was never educated about the dangers of pesticides and big agriculture. We need to work these issues into more conversations because if people knew the truth about their food, more people would be on board with the organic/ DIY gardening movement.

While Jim and I focused our eco-hours on tending to the garden this quarter, Kate was busy working on food issues from a different aspect. She challenged herself this quarter to only buy and eat locally for a month, while posting her triumphs and tribulations on her own blog site. We talked weekly about her progress at our eco-meeting, and from her stories I could tell that this was an enlightening experiment. She found that the line was often blurred between buying local and getting food that was actually produced locally. When in the local health food store The Farmacy, she found herself conflicted about buying locally sold guacamole when she knew that the avocados were not actually grown locally. While she felt good about contributing to the local economy, she decided that eating seasonally and eating food produced locally is more sustainable than just buying locally.

Spring quarter brought everything to life at the Ecohouse, and I am sad to see my roommates leave but am excited for them as they are both off to California for their next exciting adventures in the world of eco-mindedness! Jim just recently earned an AmeriCorps position working for Return of the Natives and Kate will be doing environmental web-based work before heading to Spain for the year. As for me, I am off to compete for the title of Miss Ohio this week and hopefully having the opportunity to share the great things Ohio University and the Ecohouse has to offer to the entire state. On that note, have a great summer and keep on keepin’ it green until next school year!

Saturday, March 12, 2011

Nutritional Yeast

Tired of eating the same meals all the time? Looking for new ways to spice up boring dishes? If so, nutritional yeast is the answer for you! Not only does nutritional yeast add flavor to your food, it provides you with tons of essential nutrients (I know, the name gives it away).

What IS Nutritional Yeast?

Flakes- Mmmm mmm good!
So what exactly IS nutritional yeast? Nutritional yeast, or as we lovingly like to call it "flakes," is a yeast that is produced specifically for its nutritional value and is grown by culturing yeast with a mixture of beet molasses and sugarcane. After the yeast undergoes the fermentation process, it is harvested, washed, and dried. The result is a delicious substance that slightly resembles fish food, but don't let its flaky appearance fool you. Once you add flakes to your meals, you will never turn back! Mary Leciejewski, an Environmental Studies grad student and Ecohouse friend says, "Nutritional yeast is delicious and nutritious. I use it on everything. Honestly, I don't know how I lived without it!"

Nutritional Value

In addition to being naturally low in fat and salt, nutritional yeast is an excellent source of protein, dietary fiber, amino acids, vitamins, and minerals. It is an especially good source of the B-complex vitamin, which is important in promoting healthy skin growth, increasing metabolism, immune and nervous system functions, as well as reducing the risk of pancreatic cancer. Two heaping tablespoons of flakes contains 8 grams of protein and 4 grams of fiber at just 60 calories!

What Does it Taste Like?

Nutritional yeast has a strong cheesy or nutty flavor, which makes it popular as a cheese substitute among vegans and vegetarians. It can be paired with almost any dish, including stir fry, scrambled eggs, mashed potatoes, pasta dishes, garlic bread, and so many more. My personal favorite use for flakes is as a popcorn topping. Some movie theaters offer nutritional yeast in addition to salt and butter, and once you try it you will understand why!

Fun Facts 

Nutritional yeast is referred to as "savoury yeast flakes" in Australia, while it is known as "brufax" in New Zealand. In the U.S., it is sometimes called "yeshi" which is Ethiopian and means "for a thousand." Prisoners of war have used "home-grown" yeast to prevent vitamin deficiency.

Where to Find Flakes

Nutritional yeast can be found in most natural foods stores. The Nature's Market section in Kroger also carries this tasty kitchen must-have. If shopping locally at the Athens Kroger, you can find flakes packaged in a pound container and a pint (quarter pound) container.

Try These Recipes!

Ok, so you bought some flakes but aren't sure how to incorporate them in your diet. Try one of these delicious recipes and you will be hooked!

For the best popcorn you've ever tasted:
Ingredients:
  • Organic popcorn
  • Extra virgin olive oil
  • Nutritional yeast
  • Salt, pepper, garlic powder (optional)
STEPS
  1. Cover the bottom of a medium saucepan with a layer of extra virgin olive oil
  2. Turn the heat on the stove to medium-high and add a few kernels of popcorn 
  3. Cover with lid
  4. When the kernels have popped, the pan is hot enough to add the amount of popcorn you want.
  5. Wait for popcorn to pop and remove from heat so that it doesn't burn
  6. Pour popcorn in a bowl and sprinkle with a generous amount of nutritional yeast
  7. Add salt, pepper, and garlic powder if desired and enjoy!

Delicious Pasta and Greens

Ingredients:
  • Pasta of your choice (We recommend vegan pasta from Crumbs Bakery in Athens)
  • Greens of your choice-broccoli, collards, kale, etc.
  • Nutritional yeast
  • Butter (to help yeast stick to pasta)
 STEPS
  1. Boil water and cook desired amount of pasta in a pot on the stove
  2. In a separate pan, melt two tablespoons of butter (or more depending on how much you are making) and add greens to cook on a medium heat
  3. Once the pasta and greens are cooked, combine them in one pan
  4. While it is warm, add a generous amount of nutritional yeast to the dish 
  5. Enjoy!
*Remember, you can never have too much nutritional yeast, so don't be afraid to use a lot. Well, at least that's our philosophy at the Ecohouse!

Sunday, February 13, 2011

DIY: Sprouts

Interested in saving money on your grocery bill while still eating healthy? Growing sprouts at home is the perfect solution!

Sprouting is a great way to garden in the winter, and it is perfect for people who have a small living space because sprouts can be grown in a glass jar without taking up any room. Sprouts are nutritious and tasty, and compliment just about everything from sandwiches and salads to stir-fry and casseroles. Once you start sprouting, you will be hooked! Thanks to Jim, we have a constant supply of sprouts at the ecohouse in a variety of different types including red clover, alfalfa, and lentils.

To start your very own sprout collection, follow the easy step-by-step instructions below. You'll be a sprouting pro in no time!

Getting Started: What You Will Need
1) Seeds of your choice (recommendations listed below)
2) Jar (any type will do but we use glass mason jars)
3) Cheesecloth
4) Rubber Band

** If you live in Athens, my suggestion for buying seeds locally would be The Farmacy. You can buy seeds there for sprouting in addition to sprouting mixes that include a blend of seeds. Also, if you're looking for cheesecloth in Athens, you can find it at Kroger in the kitchen section.

Choose Seeds and Measure
Here are the best choices of each type of sprout source.
(Recommendations from www.thefarm.org) 
  • Best seeds: alfalfa, clover. 
  • Best beans: mung, lentil, garbanzo. 
  • Best nuts: almonds, filberts (hazelnuts). 
  • Best grains: wheat berries, rye. 
The next list indicates what amount of sprout source is appropriate. 
  • small seeds: 2-3 tablespoons (30-45 ml). 
  • medium seeds: 1/4-1/2 cup (65-125 grams). 
  • large beans and grains: 1 cup (250 g). 
  • sunflower seeds: 2 cups (500 g). 
The Process
  1. Before you go to bed, measure out the correct amount of seeds. In the case of alfalfa, 2-3 tablespoons.
  2. Next, pour the seeds onto a plate and inspect them for broken or withered pieces, small stones, and lumps of dirt (pictures below).
  3. After they're sorted, pour the seeds into a strainer and rinse under water. Make sure your strainer has very fine netting so that your seeds don't get washed down the drain!
  4. Pour your rinsed seeds into a jar.
  5. Cover the seeds with water. The water level should be a few inches (6-8cm) above the seeds. Let them soak overnight. If your seeds are medium sized, soak them for 8-12 hours. Large seeds should soak 12-24 hours.  
  6. Cover the mouth of the jar with cheesecloth the next morning and secure with a rubber band. 
  7. Turn over the jar in the sink and strain out the water. *Note- Some people save this water because it is full of nutrients. You can use it as an ingredient in a health shake or feed it to your houseplants! 
  8. Shake the jar to remove excess water. 
  9. Rinse the seeds again and shake the jar to remove extra water. Hold the jar up to the light to ensure the seeds are mostly dry. If they're too wet, the seeds may rot during sprouting.
  10. Drain the seeds all day by tipping the jar on its side upside down in a bowl or dish. 
  11. Repeat the rinsing process on the evening of the same day. For 4-5 days you will continue this process of morning and evening rinsing and draining. 
  12. Watch for growth. After a few days you will begin to see green leaves sprouting on the seeds, and white shoots will appear on beans, nuts, and grains. 
  13. Harvest! The sprouts will reach their best flavor and nutritional value after 4 or 5 days. Give them one last rinse and shake. They're ready to eat! 

**For more detailed instructions and ideas for using your sprouts once they are completed, click here.

Tips
  • For best results choose organic seeds. They are less likely to be treated with pesticides. You can buy seeds online, or visit your local health food store to buy organic dried beans and seeds to start sprouting on your own.
  • Only grow as many sprouts as you can eat in a week. Sprouts become soggy very quickly. While sprouts usually mature in 3-5 days, the sprouting time depends on the temperature of the growing environment.
  • According to Becca (a fellow environmental blogger in Athens), sprouting kits are on the top ten list of sustainable must-have items for 2011. Visit her blog for additional information about sprouting and see the other nine must-haves for this year!!

Step 2- Jim inspecting seeds


Step 6- Cover the jar with cheesecloth

Step 6- Secure cheesecloth with rubber band
Step 10- Drain the seeds

Our collection of sprouts!